Sunday, September 26, 2010

Real Toy Camera...


I had a toy camera called the Che-ez Snap. It was tiny, hardly bigger than a postage stamp. Its optics was fixed focus, with the edges being really sketchy. Color was off and over saturated. Contrast was off as well...on the contrasty side rather than flat so I liked the results, most of the time. It was all of .2, yes POINT 2 mega pixels and I loved its low Res images to pieces.

These are a few select few that are being printed up for inclusion in my goodies satchel for things to dig through (and purchase if so inclined) at my Artists Reception at Bolt Barbers' Gallery on October 14, 2010. (Details in a prior post).


Saturday, September 25, 2010

More with the toy camera...


Years ago, 2003 to be precise, before I switched from silver to a DSLR we had a little digital point and squirt for just snapshots of the kids and stuff. In retrospect that little 2.0 megapixel camera had a lot of the qualities of a toy camera, or at least a cell phone camera.

I snapped this image up on Jalama Beach on CA's Central Coast October of 2003 and found it while rummaging around for other stuff. The composition is good, the basic image is grainy to start with, pixelated colors that look like traditional film grain when viewed large and was already for a little run through CS5 to finish off the "toy camera" look that I am so enamored with at the moment.

I took the basic image and used "filters">"Lens distortion" and cranked up the vignetting, added a little chromic aberration then adjusted the curves to darken the blacks a bit and lighten up the center ranges.

Flamed and vignetted...


I love the look of the old school toy camera. I'm also a big fan of super saturated color, and to get there today I used the vignetting tools in Adobe's CS5 to get the corners adequately darkened and still keep the center light and focused. I didn't opt for the off color registrations you could get by switching up your color chemicals like you could in old school silver based media. Rather I went for the contrasty overly saturated colors and contrast one got from the old Cibachrome print material.

To get this image I opened the RAW file and used the lens correction tool. Instead of minimizing the distortion I went the other direction and maximized the vignetting and upped the barrel distortion some to further the "fish eye" look. Once done I went into the saturation levels and upped the saturation for orange and yellow a bit to make the flames "flamier". Then I hit the ok button and opened the file and continued to work it in the 8 bit mode it was converted to for PSD files.

I used the adjustments to alter the hue and color to compensate for this being shot in the early morning in the shade. Then I made one last attack on the vignetting by going to "filter">"lens correction" and bumped up the vignette to further darken the corners. I did this to put the background elements more into the shadows making the old Flamed Woody the center of attention. Then I upped the center lighting value some to brighten up the car. Once done I flattened it all with the layers tool and converted to a smaller 72dpi jpeg file for publication here.

The real image is much larger and detailed than this compressed jpeg portrays, but you still get a sense of what the printed image is like.


Tuesday, September 21, 2010

Open invitation to my Artists Reception 10/14/2010


Mark your calenders, October 14, 2010, 7PM to 9:30PM for my artists reception at Bolt Barbers in Los Angeles. The addy...460 S Spring Street (corner of 5th and Spring) Los Angeles CA. The reception will include a hosted "Candy bar"...perfect to kick off Halloween. There is no need to RSVP as this is open to the public.

It will be held in conjunction with the Downtown LA Art Walk that runs 5-10PM on that day. Be prepared for tight parking. The Hotel Alexandria at 501 S Spring Street has underground valet parking and you can buy discounted parking from the Bolt good at the hotel. Worth every penny to avoid the other more known public lots in the area.

As soon as Bolt has their artists page updated.

The curator of the exhibit, Betsy Matz designed the post cards and chose one of my favorite images to use on the card. "Abandoned Church, Paris" is one of my favorites for many reasons. Chief of which is that its proof that the greatest rewards are when we stray from the beaten path.

We were on a walking tour of the old Jewish quarter when the guide had us change directions and pointed out there was "nothing to see" down this one small street as the church there was being gutted to turn into retail shops etc.,. Fine I kept walking. We rounded a couple more corners and he pointed out again "nothing to see...." and gave the same reason pointing down the general direction we had been. I broke ranks and jogged down the half block and look what I found, this terrific old church, built in the 1500's being gutted. What a wonderful patina to the walls, the rough hewn beams and on the other side of the wall, the church's old courtyard in full spring bloom with Victorian era apartments on the other side.

I had the camera set in seconds for bracketed exposures and shot it with HDR post processing in mind. I used Photomatix for the post processing in to the HDR file and kept it adjusted for photo-realism with maximum detail in the shadows to highlights. Had I not used HDR file generation I would have had either a beautifully exposed courtyard with a blacked out church, or church detail with blown out highlights for the courtyard. Classic win/win that you can get with HDR and keeping it real instead of surreal.

See you at the reception!

Sunday, September 19, 2010

Making it look like a toy camera...


Ah, the Diana, that old school "toy camera" that launched a photo revolution for its artsy out of focus and lost edge detail was one I too played with. Not as much as the "art photographers" I hung out with at dear old SIU, I was a commercial photo guy after all and our disciplines were supposed to be at cross purposes. Supposed to be but then again I've always had a hard time staying in the lines.

I stumbled across a tutorial for recreating a "Lomo" style toy camera image today and got to thinking about my long lost Diana and the images it could create. Especially if you shot slide film and had it processed in "negative" film chemicals. The changes in saturation, contrast and a host of other things created images that took advantage of the toy cameras basic "flaws". I got the urge to start recreating those images from razor sharp digital images and see what happened.

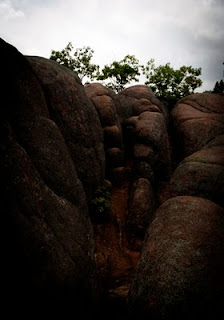
See what happened? I took a stock shot from Elephant Rocks I shot while back in MO over the summer. I am pleased with the result.

To get this image I opened a RAW file in CS5 and used the lens correction tools. I ignored the simple corrections for axis and depth of field correction and went straight to the vignetting tool to darken the corners. From there I opened the image and did a save as jpeg so I would have a standard image to work with while experimented.

The next step was to adjust the hue and color to the most natural state I could get and saved.

Next was the "duplicate layer" and let it be labled "background layer" automatically. I adjusted the saturation to more and increased the brightness by a factor of 10, playing around a bit so I kept the corners noticeably darker without blowing out the center as too bright.

Next step was to go to blur and chose lens blur. There I made several changes. I increased the blade curvature and rotation until I got the level of blur that enabled most details to remain, just pick up an overall out of focus, softness to the layer. Specular Highlights was also adjusted, to a factor of 17 for brightness and threshold moved all the way over to 255. Noise remained at 0, distribution was kept as "uniform". From there I hit OK and the PC applied the changes.

The next step was to go to the layers histogram and chose "soft light" as the blending option. This enabled to the softness of the overall background to show through keeping the feel of a toy camera in place.

Of course the easier solution to all of this is to simply find another toy digital camera that has the same "problems" IE poor optics, cheap sensors etc., that by their nature create toy camera images with all their inherent lovable flaws. May have to do that again, imagine the fun of manipulating those images down further!

Saturday, September 18, 2010

Sistine Culvert

This started out as a decent piece of urban art. Then the taggers arrived and tagged it over so many times that it no longer was art, just a tagging piece. Interesting that they opted to work under a culvert slowly filling it up towards the ceiling almost like the Sistine Chapel. Our little renaissance artists at work?

This is an image shot bracketed with HDR post processing in mind. The HDR File was generated with Photomatix (I keep going back to it as I like it, comfort zone issue likely, but I like the fine tuning tools better still). The HDR file was then processed into 8bit and tone, color adjusted and resized for publication in Adobe's CS5.

Saturday, September 11, 2010

Couple of more from the Orton path...


So the romanticism of the orton style got to me today. It got me thinking about some of my older images and how they could be reworked in the Orton style to change the look and feel of the images. So I started digging through the archives and redid these too.

To get there I duplicated the image using Adobe's CS5. The duplicate layer was labeled "background" copy. With that layer I then proceeded to increase the exposure the equivalent of 2 f stops and then through it out of focus with the blur function. The resulting image was then blended with "multiply" to allow both layers to show through. The resulting image was then merged and dumbed down (smaller lower dpi) for easy upload and viewing.

Enjoy "Cemetary Sunset" and "Silent Yard".

Ala Orton : 1960 Oldsmobile Low Rider


I love orton and the way it gives such a soft romantic look to an image. In this case it adds to the old timey romanticism of the antique car that I spotted at a car show this morning. I loved this car and wanted to do more than just document it, I wanted impart some emotion while maintaining its sense of power. Orton to the rescue.

To get there I duplicated the image using Adobe's CS5. The duplicate layer was labeled "background" copy. With that layer I then proceeded to increase the exposure the equivalent of 2 f stops and then through it out of focus with the blur function. The resulting image was then blended with "multiply" to allow both layers to show through. The resulting image was then merged and dumbed down (smaller lower dpi) for easy upload and viewing.

Enjoy 1920 Oldsmobile Lowrider. It does click for a larger image.

Thursday, September 09, 2010

Installed at Bolt Barber's Gallery in Downtown LA


Its as official as it will ever be. I've been installed and have 15 Pieces hanging at the Bolt Barber's Gallery in Downtown LA.

The show runs through October 30, 2010. The opening reception should be tied to the Downtown LA Art Walk set for the second Thursday in October. As soon as I have the details will be posted here for you. (Just in case you want to come see me).

This show was curated by Betsy Matz and she did a great job grouping my work and putting it up for display in the Gallery portion of Bolt Barbers.

Deets: Bolt Barbers 460 South Spring Street, Los Angeles CA (5th and Spring for your cross streets). Parking can get pricey and is scarce downtown. However....if you park in the lot under the Hotel Alexandria (501 Spring Street) and purchase a validation at Bolt for $3.00.

Saturday, September 04, 2010

Gallery Card Proof


Its' official, am going into the Bolt Barbers Gallery in downtown Los Angels for a nice 2 month run. I"ll be announcing the opening reception as soon as the date has been nailed down. Likely it will be a late opening reception set in conjunction with the Downtown LA Art Walk. Exact date will be announced as soon as I know it.

Monday, August 30, 2010

A little life imitating art


Sometimes, just sometimes you manage to get the details right by waiting a bit. Cropping helps too. I spotted the worker on an earlier pass but the shadows weren't right to make the image "work" the way I wanted with the tromp l'oeil on the side of this buidling in Venice Beach that was getting a little touch up work done. A couple of hours passed and lo-and-behold the artist doing the work moved his ladder up higher AND the sun moved enough that the shadows matched direction.
Call it all in the planning for the shadows, stroke of luck with the artist moving his ladder up higher.

Friday, August 27, 2010

Slowing it down has its purpose too


Not everything needs to be frozen in space. Sometimes action photos benefit from slowing down the shutter speed so things in motion blur better conveying their speed than a freeze frame would.

I shot this image with a slow shutter to allow the shark and moving water to blur creating a semi abstract frame. If you look closer you'll notice some spots in the image are still and in focus furthering the illusion of speed and power of the passing shark.

The image was shot at "Shark Reef" at the Mandalay Bay Resort in Las Vegas. Worth the price of admission as they control how many people are in the exhibit at one time so you actually get a little time and space to shoot what you want.

This image was processed from a RAW file with Adobe's CS5 and color corrected so it would look "right" when viewed.

Thursday, August 26, 2010

Lion Fish

Aquariums are great places to explore the underwater world without the expense of learning to scuba dive (not to mention the cost to get there).

Shooting in an aquarium has its moments where there are numerous challenges to overcome. Some are easier than others...like unwanted reflections off of the glass. Simply attach a polarizing filter and adjust until the offending reflections are gone. Voila...no one knows you were standing in front of a wall of glass with a horde of others, it looks like you were really up close and personal with no barriers.

This image was processed from RAW with the help of Adobe's CS5. The color tone and temp were adjusted to get read of the hue shifts due to the combination of natural and artificial light sources.
Other than that it is how it appeared through the looking glass there Alice old pal.

Saturday, July 31, 2010

Day is done...fine tuning with CS5 from RAW Files

For reasons unclear this set of images keep drawing me back to work them differently for different reasons. Maybe its because it was a colorful sunset, something generally lacking here in So Cal unless we have a raging fire somewhere, or because the location has special meaning to me. Not sure, but I keep reworking.

Today I took one of the bracketed exposures and used nearly all the tools available in CS5 "Photography" section to adjust and fine tune exposure, color, hue, lens correction etc to get to this image "Day is Done".

Tonight, July 31st is the second of the Monrovia Association of Fine Arts Summer Art Walks and it is dedicated to photographers. I'll be there in the Paint n Play Studio and Art Gallery from 7-10PM. IF you see me and are in the mood for a little tipple, just ask as there is a private reception that I can invite anyone I want into at the back of the gallery. The Paint N Play Studio and Gallery is located at 418 S Myrtle Avenue, Monrovia CA. (This is the shameless self promotion portion of this post).

Friday, July 30, 2010

New image for 7/31 MAFA Art Walk


This is among several new images printed just for the Monrovia Association of Fine Arts Summer Art Walk being held in Old Town Monrovia this weekend. The image is one of several I shot at Missouri's Elephant Rock State Park earlier this month.

To see me and my other images you're welcome to attend the Free Art Walk dedicated to photographic arts July 31, 7PM-10Pm. I will be in the Paint n Play 2 Art Gallery and Studio located at 418 S Myrtle Avenue, Monrovia (91016 if you need a zip for google maps).

Saturday, July 17, 2010

Surfers in Ventura


Just a couple of quick arty shots from our trip up to Ventura and Santa Barbara counties. We took a nice stroll along the sidewalk bordering the ocean near Harbor Blvd in Ventura. Great little spots to just and sit enjoying the ocean and surfers. They even have a nice pier that isn't commercialized like some of the others in the area where you can just walk out and not be annoyed with a dozen vendors hawking stuff....makes for great sea life watching at the base as well as watching surfers from afar.

Sigh...to return from cool oceans breezes to Monrovia's 110+ heat was a bit of a shock. Wish I was back there right about now. With my boogey board.

The two images were post processed to fine tune exposure, contrast and color vibrancy from RAW files using Adobe CS5.

Friday, July 16, 2010

Lake Cachuma Valley in panoramic form


So after the long weekend of play back in MO I took off with the better half for a few days of continued play in the South Central Coast area of So CA. Managed to hit the wineries in Solvang (you gotta track down Lion's Peak winery) and Santa Ynez.

What was a bit of a disappointment was that CA State Highway 154 from Santa Ynez to Santa Barbara had too few turn outs and vista points where one could really get out and do some shooting in the beautiful hills and valleys. We did find one nice "Vista Point" where we stopped and grabbed a few shots of Lake Cachuma and the surrounding hills and valley, even got this decent panorama stitched from 5 individual frames. You can click to embiggen this image.

Lovin' the ease Adobe's CS5 lets one stitch panoramas together so well.

Tuesday, July 13, 2010

One last Sunset for MO...ala HDR


I kept it "photorealistic" not surreal. The scene was surreal with the sun lighting the bottom of a clearing thunderhead at sunset that it didn't need any further digital help.

To have some detail in the shadows this was shot with rain drops falling bracketed +/-2EV (stops) and the resulting RAW files were run through Photomatix for the HDR file generation. The resulting HDR file was then tonemapped in Adobe's CS5. A little color correction was in order to remove the too much orange reflected from the clouds and voila "Cemetary Sunset" was created.


Elephant Rock State Park and HDR...


Among the spots I hiked was the Elephant Rock's State Park in the Ozarks of Missouri. It is an interesting are where gigantic boulders of granite were exposed after eon's of weathering. On any given day you come across way to many hikers to call it solitude, but even with them in the rocks its a pleasant way to spend some time, they just have a habit of being around to "ruin" shots of the rocks one wants to get for use arty reasons.

All of these were shot bracketed +/- 2 stops (ev's in the digital realm, but what the heck am old school) and from there the RAW files were blended into an HDR file using Adobe's CS5. The tone mapping was also done with CS5 and done so to maintain a photorealistic as opposed to surrealistic image.

Enjoy 3 images from Missouri's Elephant Rocks State Park.

Panoramic images in CS5


Woot its a party at the PC with CS5's multiple options for blending images for panoramas from several shots. You need to play around with them to get to understand how they take images and blend them together. What you need to know is I used "Spherical" as the option and used 3 basic jpeg files to get to the desired image with minimal distortion.

The actual file is HUGE...so I re-sized and dumbed it down to fit into a blog post. Suffice it to say its still a very large image that gives you a sense of the depth and views from atop Tom Sauk Mountain in MO looking over the St Francios Mountain Range that is with the northern Ozarks and is the highest point in all of MO.

Click away for a larger version for your viewing pleasure. I sure do pick nice places to explore over vacations.

Next is the wine growing regions of Santa Barbara County.

Tuesday, June 15, 2010

A Little HDR in the photorealism realm


I shot this from a balcony at the hotel we stayed at for a basketball tournament this last weekend. Pardon the noise....I used a high ISO setting to keep the shutter moving fast(ish).

I did the tonemapping with Photomatix...I like its controls better still than CS5 for capturing fine detail and the ability to micro control contrast.

Thursday, May 20, 2010

HDR Photorealistic option


'Nuff said. It works. Old image that the drop down not only teamed the demons of ultra contrast range but multiple colored light sources. Life is good when you want to be a realist and still use HDR generation.

Wednesday, May 19, 2010

Autochrome and CS5


I can get the feel, but not the same delicate images. I can create grain, but that is part of the equation. The original autochromes had potato starch that was died and outlined with carbon black. I can duplicate the color grains by adding noise and pointillising the image, but I can't get the black outline around the "grains" created in CS5.

I shall keep working on it, but until then here are two images in the style at least to keep me contented that I am on the right track. Once I nail it I'll post the step by step it took me to get there.

Tuesday, May 18, 2010

A little orton...of an area now burned out.


Concurrent to the Station Fire that wiped out so much of the Angeles Forest in the San Gabriel Mountains there was the smaller Fellow's Camp fire that did damage as well to the forest. I'll be heading up there in a day or so to see what wild flowers and other green has returned to the area. When I was last up there, much of the west side of the river was burnt to the ground and nothing but ash, but that was January before the rains really came in hard and washed stuff away.

Hopefully there was enough rain to ensure the wild flowers and stuff returned this spring. It will be many years before this view looks the same. Maybe I shall get a pic from the same vantage point and post as a comparison in the coming days? Maybe.

Monday, May 17, 2010

Another stab at painting...


This is quite the learning curve I am on. Right now am just learning one brush at a time to see what it does. This time around its a wet stiff bristled shorty. So far so good, what my next step after completing the learning about what each brush does...is to learn to combine them on one canvas like a real painter would do.

I have learned its a must to scroll in close and work top to bottom doing back grounds before the foreground or subject matter. It does make it much easier to bring about the feel of a painting.

Out of focus backgrounds are a challenge to blend and I am not completely happy with the result on this.

Iris. I have a ton of them, enjoy just this one.

Sunday, May 16, 2010

More with the magic brush...wet pick up and bold brush


OK...I haven't decided whether this is a useful tool in my kit or just a novelty. Regardless I am enjoying using it and learning what it can do. I see the potential to apply it to "real photographs" for some spot work as well as making paintings. The latter I think on watercolor paper will help the "painterly" effects even more.

What you see here is the original image and my rudimentary learning on how to use the tool.

A little surrealistic HDR work


The surreal tab in the HDR menu blasts contrast and details, leaving an end result not unlike how one would imagine a nuke blast looks. I kind of like it.

I've been sitting on this one for a little while, mostly because there were some huge power lines running through the sky that I just couldn't get rid of in old CS2, or at least delete them believably. In CS5 and the "content aware" fill as you use the "band aid" to remove them its another story. An otherwise distracting element rendering an image you want can be saved in CS5. (I should note the proper name for the band aid is "spot healing brush" with 3 other tools available in a drop down available by right click).

Saturday, May 15, 2010

more fun with magic paintbrush


This is actually kind of fun. Tedious with a mouse, but fun none the less. The magic paint brush lets you pic up color from the underlying layer whilst painting away. Blending and all that other stuff is done with adjustable presets allowing some of the underlying to show through, if you want.

In playing around with this tool I've discovered that the lower res, smaller files are easiest to work on and get acceptable results. I tried working on an 8 megapixel image and nearly lost my mind sampling small areas at a time and trying to paint. It is much easier to reduce the size of the image and dpi and work from there. The compression of detail doesn't matter, actually helps in putting together an impressionistic image...like Painted Jalama Dunes you see here.

I really need to invest in a pen and tablet if I am to explore this option further. Of course to get there I need to sell A LOT of prints.

Friday, May 14, 2010

One more orton and I call it a day...


This area is gone now, the Station Fire of last fall saw to the destruction of much of the Angeles National Forest in the Big and Little Tujunga Canyons. Sad, but I have this little bit recorded for posterity and it will be years before it looks like this again.

Fortnight Lily ala orton


Thankfully tools in don't change much and I can easily create layers and ortonize images. This is the Fortnight Lily aka African Iris that has been given the Orton treatment. Starting from RAW files as discussed earlier gives one a lot more detail to work with to start, the added bonus comes into play when working in the orton style in that you have highly detailed layers under the blur to add to the impressionistic feel of the final image. I like that.

Meander through the garden this morning...


With so much in bloom I opted to play in the garden with the camera this morning. I've been shooting and working from RAW for quite sometime now for a lot of reasons. Adobe's CS5 has some really powerful tools for taking that RAW file and getting it ready for use in photoshop with nominal adjustments needed. The advantage to this is that you are using all the data captured at the time of the shoot and have it available for use as needed.

Anytime you have an uncompressed file you have more to work with which helps. Of course to get it to fit here in downloadable fashion I do have to resize and reduce the dpi and save in jpeg fashion which unfortunately compresses out a lot of detail. In the end you get here a flavor of the final image, the real deal needs to be seen in person for the full effect.

The two roses are among my favorites in the garden. The pink one is "Shropshire Lass" that is a beautiful single rose that blooms just once a year. The yellow is my favorite of all the yellows out there. It too is a David Austin English Rose, and is named "Golden Celebration".

Thursday, May 13, 2010

Playing with paint brushes...


I'm intrigued by the variety of tools in paintbrush, specifically the "mixer brush" that allows you to pick colors from a background and paint on a new layer pick up "paint" or color from the underlying layer and mixing.

This image was worked with the mixer brush and using several different samples of color to fill in the sky and buildings for a painterly effect. I like these tools.

I think if I'm going to do anything bigger or more dramatic will have to invest in a tablet and stylus as doing this with a mouse is very tedious work.

Wednesday, May 12, 2010

RAW fun with Adobe CS5


Am enjoying the use of the RAW tools available in CS5. Much better than what came with the camera. I have to remind myself that the camera's program is 5 years old and programming and technology has grown in leaps and bounds since I bought the camera. This program has certainly breathed some extended life into the use of this camera body.

Enjoy the fish sculpture shot at the Santa Monica pier.

Tuesday, May 11, 2010

"smart content" really does fill in when objects are deleted


So here we go...I wanted to test the "smart content" option on the healing brush and use of magic lasso to delete objects but let Adobe CS5 fill in the missing object on its own. Beats the heck out of the old days where one would delete an object and have to use clone/copy to fill in the hole with something else in the picture then try to blend it in with brushes.

This is a pretty severe before and after. Can you count how many things I removed? The wall between photography and digital art has been broken down even further! (The images do get a bit bigger to see the differences and how well smart object worked. There was very little cloning and paint work needed on the edges for clean up which is a testament to the programmers abilities.

Removing "Ghosts" from HDR files....


Wow. Just wow. Finished the tutorial regarding HDR ghost removal as well as the one on "surrealistic" options. CS5 is just amazing.

Now, please don't get me wrong, but the ability to remove ghosts is as important as keeping them in. Why...solves out of registration issues. The plus side is if you want them there you can keep them there by simply not checking the remove ghosts box...that way objects in motion can remain in motion as a blur and ghosted if its important to the image.

This file was one I knew that had a lot of loops to toss at CS5 to see how well it would handle a variety of issues. Simple drop downs and I had a "surreal saturated high contrast" image and the ghost tool removed the moving cars that otherwise were blurred headlights streaking by. Changes the whole feel of the picture to have cars simply frozen in time and the blurs removed. It was just an experiment, but I liked the results.


Sunday, May 09, 2010

reworking a prior in CS5


I do believe am going to love the toolboxes in CS5. This gem started as a Photomatix generated HDR file but I did the tone mapping in CS5. Ultrareal was the approach and I liked it.

I have to admit I have a little OCD when working my files. I save each step of the way and code the step so I can go back to any point in time whenever I want to redo an image. That way I have a standardized start point and can rework the file until I have an image I like. Could explain why I filled up a terabyte external drive so fast....multiple files of the same starter image. Pays to back up externally as well as on DVD, just in case you have a multiple drive failure you still have a way to retrieve old files.

Sadly...the new machine doesn't have a "floppy drive" and I didn't back up any of the old files on floppy, but then again I doubt that I'd have much use for under 1megapixel files.

Friday, May 07, 2010

HDR in CS5


This part of the program has grown considerably...especially in the area of out of registration corrections. I can only imagine the programming that went into that one. But in short if you have something a little out of registration, like tree limbs or flags moving it will fix the problem by letting you select the frame that will serve as the master for registration purposes. Wow.

I'm not entirely convinced that the tone-mapping is as developed as that in Photomatix, but then again I haven't dug far enough into the program to see what I can do. So far working a "real" image as opposed to "surreal" the work is much easier to fine tune. Maybe its just an issue of figuring out which tool corresponds to that in Photomatix for the surreal effects? Nah, its never that easy.

Another tool I like so far is the "Auto tone" for minor color correction, I haven't thrown any curve balls at it yet like multiple light sources, but what I have done so far is use it to clean up the cyan cast that one gets with HDR file generation. It works well for that. Of course they have full photo filter layer correction available but its nice to see what it can do automatically before you start strolling down the custom paths.

CS5 and Black and White


Wow...the CS5 controls black and white so much better than the old CS2 which simply desaturated. This program handles the file as if it were really black and white to start with and gives preset options to control the effect of filters on silver, contrast filters on the photographic paper. The works. Even better than the presets that were on the "Virtual Photographer" plug in I used with CS2. Dudes...you did your homework nicely.

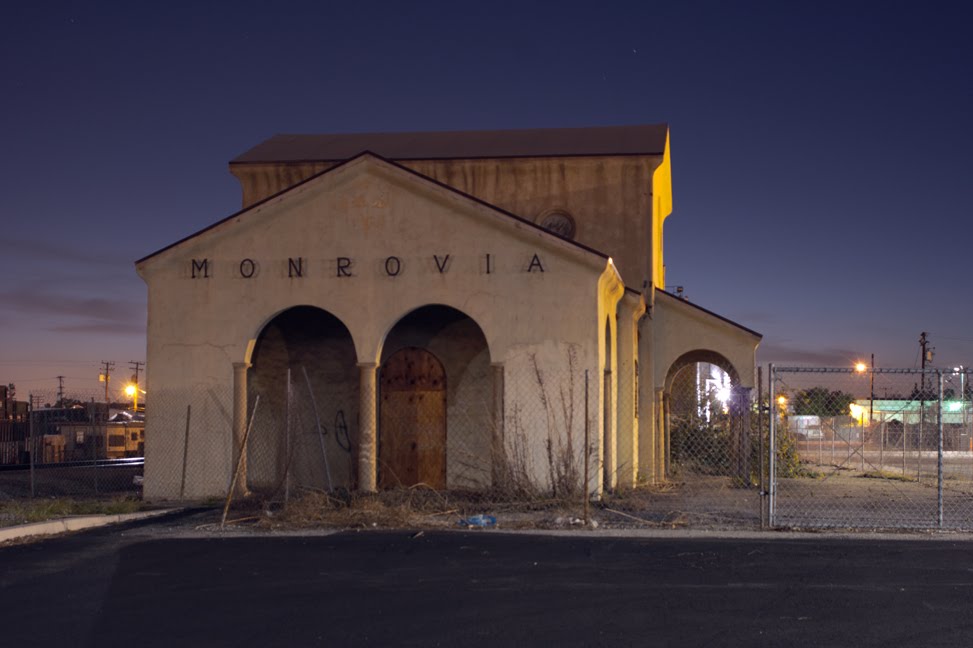
Enjoy "Monrovia" our old rail station soon to be rehabbed as a Metro Gold Line station in the coming years. The actual image will be available for auction at the Monrovia Association of Fine Arts big fund raiser the "Black Tie Event" on 5/15.

CS5 Arrived...and it really is an amazing program


IT still works like the old programs in terms of menu changes. The "magic healing brush" does an amazing job of deleting objects. In this case a big old sign in the middle of the picture.

The image was shot several years ago with an Olympic point and squirt 2.5mp camera...can you imagine that being state of the art? Ever? Anyway it was just random shooting in the early morning hours and I liked the composition just not the sign warning to stay alert due to a nearby prison.

I dug this out and took it upon myself to use the magic healing to remove a sign and then ortonized the whole image. Thank goodness I didn't have to learn new tools and what there was was so intuitive it really was nice.

Enjoy "Jalama Beach Dunes".

Wednesday, April 28, 2010

Oranges ala Orton...


Kind of getting back on track after a flare up of the dreaded CFS. I took this image at the new Monrovia Farmers Market that takes place on Sundays. Nice fresh produce and none of the swap meet atmosphere one gets at the Friday version. I like it much better.

The image is post processed in the Orton style that I detailed here earlier last year. Love the soft romantic look of the images that result.

Also...I got a new 'puter that is so much faster than the last. Its got the AMD Phenom Quad core 955 chip with a whopping 8 gigs of ram plus a host of other goodies. Since CS2 isn't entirely compatible with the new Windows7 OS am getting a copy of CS5, due to arrive next week, to take over with the post processing duties.