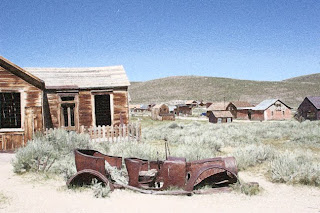
 I hate to say it, but if they still made the Autochrome plates I'd be first in line to a) buy them and b) buy a large format camera so I could use them. The more I research them the more I fall in love with the impressionistic renditions of the subject they produced. Amazing that even war torn France in WWI yielded stunning images for its day.
So I am torn with how to shoot, I don't want a whole lot of modern references in the images to keep that old timey look and feel. Part of me says run out and shoot the new and give it the same treatment. The debate will range internal for a bit as the next few days are pretty with stuff.
How I got to this image for those of you wanting the technical details.
First I opened a stock image I had from Bodie CA shot a couple of summers ago. I duplicated the image and closed the original. (Never work from an original unless you want to risk accidentally saving a manipulation and losing it forever).
Next create a duplicate layer. Go to adjustments, saturation and reduce the saturation on that layer by about 1/2.
While in that layer you will visit the "Filters" section a few times.
First go to Artistic and chose "paint daubs".
Second go to Artistic and chose "film grain" and chose a medium sized grain.
Third go to "Brush strokes" and chose "Ink Outline" and chose a smallish brush stroke.
Go to blending tool and scroll through options to get to "lighten". Adjust opacity and voila a pretty close rendition of an Autochrome is ready for sharing and printing.
BTW...shameless self promotion. If you don't have anything to do Saturday evening August 29, pop in to see me in Old Town Monrovia for the Monrovia Association of Fine Arts final Art Walk of the summer. Details on LA Metblogs.


No comments:
Post a Comment