Thursday, November 17, 2011

The Auto Show is made for HDR images


I've made mention in the past that HDR, High Dynamic Imaging is one way to control contrast and get details in the highlights and shadows beyond what a normal DSLR can capture.

Since it is a bracketed exposure set to capture highlights, mid-range and shadow as "perfectly exposed" when you get around to generating the HDR file you have complete detail across a much broader EV scale than what you can get with just one image.

Both of these are HDR images that I post processed with the help of Adobe's CS5.  The Top image, that of a Cadillac ELR that is set for production in the next few years was done more with a surreal touch whereas the Mustang GT500 was done with a more realistic blending.  Both work for their own reasons.  Both will show up in publications around the web.

I have on flickr an entire set devoted to the 2011 L.A. Auto Show HERE.

Sunday, November 06, 2011

What I did Friday night...

Yup we saw Cyndi Lauper on her "Memphis Blues Tour".  Great concert, amazing energy and songs by Cyndi Lauper.


Saturday, November 05, 2011

A little panorama action...

Yesterday I went to Torrance to the American Honda HQ for an Acura event.  While there they opened up their museum for a luncheon and a tour.  IT was quite impressive to see their collection of historically significant Honda's and concept cars from over the years.

This image was done with the photomerge too in Adobe's CS5.  The program does a pretty slick job of matching frame content to create a single large image.  Enjoy the sneak peak into the American Honda Museum that is not open to the public, rather is a by invitation only.

Tuesday, November 01, 2011

Very Foggy Morning

Its not the tool used that makes the difference, its the photogs eye.  This little gem was grabbed this morning with my cell phone as just an example of using a low res tool to its advantage.

Tuesday, October 25, 2011

Sierra Sunset ala Autochrome

I do love the Sierra's.  I find them a great respite from the rigors of day to day stuff.  I shot this a couple of summers ago while on a trip to June Lake.  This was actually a trail off the main road to Mono Lake.  I loved the suns final ray shooting through the mountains before dusk settled into night.

I decided to do this one in the Autochrome look as I felt the painterly impressionistic results fit the image better than the simple RAW image would have given.

This took several steps, most of which I've outlined here in the past.  I do love the simplicity and WYSWYG preview results you get with Adobe's CS5.

I've got a show this spring and am debating what to do.  Should I present all "ala autochrome" or should I go with all "scanned hand painted negatives".  Hell, I can't even decide what one image I should submit to the LA Center of Digital Art for their "Unjuried" Show, which I just adore, in December.  What to do?  Create more is the answer and let the most powerful series be the choice.

Sunday, October 23, 2011

Freeway Daisy from a scanned negative

Just a splash of color in a scanned negative.  This time around used CS5 and just painted a layer.  I don't like the effect as well as a marking pen...lacks that neonish glow and depth one gets when you paint on a negative directly.  Experimentation is half the fun of photography.  I used CS5 to create a layer to color then blended with multiply at 75% strength to get this image.

Friday, October 14, 2011

They strung me up at First City Credit Union

Yup, one artist flaked and I got to go into the First City Credit Union Gallery today.  6 Pieces all hung, and information tags all done now its there for the public to enjoy until January.  The First City Credit Union Gallery is a joint effort with the Monrovia Association of Fine Arts exhibiting works of its members.

The 6 pieces:
Bodie Blue Window
English Rose Bud
Abandoned Church, Paris
La Tour Eiffel
Wild Flower
Lily

Its a nice selection of photographs, digital art and hand colored negatives.

You can see them Monday through Saturday in the First City Credit Union main lobby. First City Credit Union,404 E. Huntington Drive, Monrovia, CA 91016

Thursday, October 06, 2011

Another adventure into the old bucket...Blondie Live at Club Nokia

Last night I took a break from the Celebrate the Arts prep and devoted the evening to an adventure.  I've always wanted to see Blondie live and last night it happened.  Worth the effort.  Check out the YouTube vids I shot at the concert.  Love these little diversions from the daily routines.


Wednesday, October 05, 2011

Art for a cause...raising funds for art education in the schools

This weekends Celebrate the Arts that I'm participating in is more than just an Fine Art Event.  ITS about raising money to bring Art to the community. ITS about raising money to help bring art education to the schools via the Village After School program in the MUSD elementary and middle schools.  ITS about Pallete Grants, mini-grants to SGV area schools for in class art education projects.  You can learn more about what the Monrovia Association of Fine Arts does on their website HERE.

At the Celebrate the Arts we have a few things going on that are dedicated to funding our various art programs in the city.  The biggy is the Silent Auction of donated pieces where 100% of the proceeds go directly into the grant funds.  All of the artists (well most of them) in the Celebrate the Arts donate a piece for inclusion in this auction.  Monrovia High School done in the Orton style is my piece being donated to the cause.

Celebrate the Arts will be held in Monrovia's Library Park the weekend of October 8 &9 2011.  The library address is 321 S Myrtle Ave, Monrovia CA to help you find it via google maps.  Celebrate the Arts will be open 10AM - 6PM both days.  Come enjoy the art and of course bid on the Silent Auction Items that strike a spot in your soul.

Friday, September 30, 2011

Handcolored negatives to debut at Celebrate the Arts


Varying degrees of success getting the saturation I want with neutral black and white surrounds. With the exception of the yellow rose...that was purely an exercise in color contrasts and pen point vs broad side coloring to build texture.  I think it all worked, 'cept the first.  Am slowly learning that it isn't exact opposites on the color wheel when scanning hand colored black and white negatives to make them into positives.

A bit on scanner settings. I do scan max DPI with the Epson Perfection V600.  I scan from the profession mode where I can get the best control of the final output.  The max DPI is 12800 which even from a small negative yields huge files...along the order of 50-70 megs depending on the detail in the image.  I chose the scan in 48 bit color to capture all the subtleties of the color I apply to the negatives.  I still use the Black and White film as type as opting for "color negative" gives it all a ghastly orange tint that simply can't be corrected out.

File resizing for image size and usable dpi for images is done with the help of Adobe CS5. While we are on the topic of CS5, have I mentioned recently how much I love the "spot healing brush tool"?  Its simply magic and is the most useful tool in working with scanned negatives and "spotting" out rough spots in the color or removing dust particles.  No matter how clean I keep things there still is dust that makes it into the scan...microscopic stuff that I can't really see until the scan is blown up, yet the tool removes it and blends in the scene perfectly.

These images will be appearing in the trusty satchel of images and possibly framed for the coming Monrovia Association of Fine Arts "Celebrate the Arts" to be held on October 8/9 in the heart of Old Town Monrovia in Library Park.  (Monrovia, California, not Libya).

Tuesday, September 27, 2011

Hand colored negatives for the Celebrate the Arts


I love the impressionistic look of these images.  Color that is translucent overlayed on a sharp crisp image below.  Adds a dreamy quality to them.  Agree?

You can see them at Celebrate the Arts, dry mounted and all set to go in my satchel of goodies to dig through.

Celebrate the Arts is in its 48th year.  It is hosted by the Monrovia Association of Fine Arts and will take place October 8&9.  More details HERE.  Come see me and all the terrific artists that will be there.

Sunday, September 25, 2011

The joy of hand color negatives

In theory using the opposite color on the color wheel will get you the color you want.  In this case for reasons unknown that theory didn't work.  I used a nice shade of green expecting red and got purple.  I still like the result, note how the bleed beyond the signpost seems to make it glow.

This is part of the experimental hand coloring of negatives to add artificial color to a monochromatic scene that I have been working on over the last few months.

The scene was shot on Tri-X pan, developed in 1:1 D76 for max details and contrast range.  The finished negative was hand colored with a Crayola brand "super tip" marker then scanned with an Epson Perfection V600 Photo scanner at max dpi.  Adobe's photoshop was used to resize the file for printing and publication (like this web sized image).

It will be one of several hand colored negatives printed for the satchel of loose prints at the coming Celebrate the Arts.  I'll be in a space right on the sidewalk near the corner of Lime and Myrtle in Library Park here in Monrovia CA 10/8-9.  Come see me and my work in person that weekend.

Saturday, September 24, 2011

See me at Celebrate the Arts in 2 short weeks


Its coming and coming fast.  Much to do to be ready for the Celebrate the Arts hosted by the Monrovia Association of Fine Arts.  It will be held in the heart of Old Town Monrovia in Library park located at 321 S Myrtle Avenue here in good ole Monrovia, CA.  It will be on October 8 and 9 from 10AM until 6PM.

The image "Spring Bouquet" will be one of my featured images at the show.  It started life as a high resolution digital file that I reworked in the Orton Style.  This involved numerous steps creating masks and such to creat the off color, partially out of focus view of the world that only a Lomograph can do.  Of course if you are using a real toy camera such as a Diana and good old silver based films you can create such an image with only a quick click of the shutter button and scan in the resulting image.  I have to do things the hard way.

Regardless, enjoy the quick sneak peak at what I will be showing at Celebrate the Arts.

Friday, September 23, 2011

A little time at the LA County Fair

I spent a little time at the LA County Fair the other day.  They had a great little history of neon signs exhibit up. Some cool stuff, of course this one wound up being my favorite.  Have an older folding camera similar to that in the sign, problem being is that I just can't get film for it anymore.  :(

Right now its all about getting prepared for the Celebrate the Arts fair being hosted by the Monrovia Association of Fine Arts here in Monrovia CA.  Its a great little fine art event that is well attended and everyone seems to do well...or as well as anyone can do given the current state of the economy.  More on it HERE.

I'll have quite a bit of new stuff to add to the hamper of loose items as well as newly framed for this show.  That is what I'm doing now...printing stuff for mounting and framing.

Hope to see you all there on October 8-9.

Monday, September 19, 2011

A little low light action photos


I have a bit of a dilemma here.  I love low light and abhor flash.  Making matters more difficult at the Ventura Raceway this past Saturday is the protective fence that keeps cars from flying into the stands also buggers up the auto-focus on the camera as the camera wants to focus on that stationary fence rather than the action.  Do you have any idea how hard it is to focus on fast moving cars manually in low light?  Buggers I tell you.

Regardless, I did get some images that were usable from the races.  The highest ISO (1600) my camera can go to is also a bit noisy, most noticeable in the shadows when viewed at maximum size.  That ISO isn't as high as some of the newer DSLR's can achieve but does yield satisfactory handheld images. The ISO limits speeds to under 1/100 second which yields blurred images of the fast moving cars...not a bad thing when you are trying to convey their speed on the track.

More pics in my flickr set.

Thursday, September 15, 2011

Thanks to all who voted for me.

Color me humbled and tickled pink. This little art blog, all about what I do and how I get there made it into the semifinals for voting in the Most Valuable Blogger Awards 2011 run by KCBS here in LA.

Thanks for the vote of confidence. I'll be updating with more images very soon now that the dust is beginning to settle with a bunch of projects I have had up in the air of late.  (Look for more examples of hand colored Black and White work in particular).


Saturday, September 10, 2011

Its been all about cars the last few days.


I've been shooting, some B&W but need to finish the roll so it will be a short bit before I get to that part. Funny how it works, not like the digital realm where you just offload immediately and not have to worry about "finishing" the roll.

This week has been busy over at SoCalAutoBlog. So much so that its been at the expense of everything else I need to be doing. Its a good thing to be busy, just would like a little balance in the deal. Today was the 21st Annual Street Rods Forever car show here in Monrovia and spent my morning there.

The three images here are HDR images. Today was just a crappy day for car shooting...overcast and dull shadows. It may be an even overhead light but it still sets you up to lose shadow detail. This saved the day. The HDR post processing was done with Adobe's CS5 and is a stupid easy process. Pick the frames, the blending (I chose photo realistic) and voila you are done.

More from the day in my flickr set.

Friday, August 26, 2011

Art Walk Saturday 8/27 7-10PM


I'll be there with this new image all framed and ready to go. It is a hand colored black and white negative that is scanned and printed with the help of a PC on archival quality matte paper. The shadow detail is stunning if I say so myself...this is a big part of the reason why I am doing my own B&W work rather than simply converting a digital image to monochromatic.

Silver based materials really do have a depth of gray that you can't match by simply removing color or desaturating a digital image. For the few extra steps needed to bring an image about and get it ready for show the image quality is in another world. Definitely worth the effort.

Enjoy "Wet Lily" and see it in person this weekend at the Monrovia Association of Fine Arts last Summer Art Walk to be held in Old Town Monrovia. I will be near the Paint n Play Art Studio and Gallery and will be available to talk to you about what I do as well as show you what I have both at the Art Walk and in the Paint n Play Art Studio and Gallery. Look for me on the 400 Block of South Myrtle in Monrovia.


Sunday, August 14, 2011

HDR to the rescue in an airplane hangar


The Palm Springs Air Museum is pretty much lit by massive skylights. Makes for bright tops and very dark bottoms of the planes you try to shoot. Also it leaves for dark corners and ceilings. HDR fixes that by blending frames set to expose the highlights and shadows in with that done for the middle tones.

To get these shots I shot "RAW" and bracketed +/- 2 stops...or EV in todays DSLR lingo. I used Adobe's CS5 to do the HDR file generation and tone mapping for "photorealism". If you look close at the images areas that were completely dark such as inside the engine cowl you now have detail. Ditto the tops of the planes that were blown out because of the direct light from the skylights above have detail too. It even helped bring out details from a black plane that was in the shadows. Its all good.


Saturday, August 13, 2011

A little travel R&R


This last week was spent in the Palm Springs Area. We love going out there to just hang in the pool and enjoy the desert heat. Yes, August can be beastly but all is right with the world as long as you have a pool to cool off in.

On our radar for a while has been the Palm Springs Air Museum on the airport property. This year we finally made it too there and wish we had done so much earlier. What a great place to spend an afternoon. It is two huge hangar just stuffed with old airplanes from WWII along with a ton of dioramas giving you a terrific snapshot of that era. The docents wound up being extremely engaging and probably the best I have ever seen for bringing history to life...some of them are actually old enough to have served in the war and have their stories to share.

This image was shot with an ultra wide angle lens and stitched together with Adobe's CS5. The photomerge tool there does an amazing job of combining images into one panorama. If you haven't played with it you should.

The Palm Springs Air Museum is located at 745 Gene Autry Trail in Palm Springs. Their web site has a ton more details as to when they are open and any special exhibits going on.

There are quite a few images also in my Palm Springs Air Museum set on flickr HERE.

Thursday, August 04, 2011

A "duh" moment, playing with masks


I don't know why I never thought of it and its stupid easy to do. Using either the magic lasso or quick selection tool in CS5 you can outline an object, select inverse and turn the area outside your subject into a black and white or whatever type of image.

These are just fooling around with tool images, nothing spectacular but they do illustrate the ease and potential of the tool.

For the graffiti trash can I opted to add in an extra layer, one that I used the lens blur filter in to throw everything but the trash can out of focus. Blending that layer and then cutting out the trash can in a mask again I could then turn the background black and white making the trash can stand out more. Fun stuff now to do something practical with it all. Or not.

Wednesday, August 03, 2011

Autumn Walk, CS5 cleans up a negative scan


Although my scanner, an Epson Perfection v600 Photo, does a very good job of scanning images not losing detail etc., the resulting files do need some help bumping contrast without losing too much detail in the process.

To achieve this image I took the scanned negative and rather than using "auto contrast" that simply reduces your curves I opted to apply a gradient map. Yes, another layer of black and white then applied as overlay. Gave be much better blacks while maintaining some detail in the shadows, ditto better detail in the highlights. When done I just merged the visible and sized it for here...the resizing does eliminate a lot of detail but you still get a good feel for the final image.

Love me my scanner and adobe's photoshop CS5.

Sunday, July 31, 2011

A little artistic diversion for a Saturday night

Saturday 7/30 was one of the Monrovia Association of Fine Arts' Art Walks. As part of the infotainment fellow artist member Heather Shaw and I teamed up for a painting swap-a-thon. A Swap-a-thon is a team painting where we take turns adding layers upon layers of paint to a canvas until we come to a final painting. The process takes a couple of hours and is fun for us as artists as well as entertaining and educational for those watching us on the sidewalk as we do our painting.


We don't work from a picture or a scene in the street. It is purely an exercise in painting from imagination. The final painting is always a surprise to us as one never knows what twists will take place when the swap takes place. Eventually you hit the zone where you are putting in final details and you are done.

Friday, July 29, 2011

A little before and after Autochromed

Before image in HDR
After ala Autochrome

This morning I was going through images I wanted to autochrome and decided to put together a before and after example for you to be able to compare. I wanted to show how much the process does alter the image and how close I do get to recreating the look and feel of an Autochrome.

The full steps I took here for those who want to geek out with me HERE. There is quite a bit of artistic license involved in the process to get to the final image, particularly in the masks to put parts of the image and edges out of focus as well as the darkening of the edges. I'm getting better control of those two variables than I had been when I first started this exploration.

Enjoy the two versions of "Vanishing Trail".

Thursday, July 28, 2011

Just a little more geeking out ala autochrome.


This image works better for a lot of reasons. To start it was done with a low-res (2Megapixel) point and squirt from that I had shortly after the turn of the century. (Doesn't that make things sound realllly old). Anyway, its easier to dumb down and lower resolution etc., with an image that was already that way than from an ultra-high-resolution that you get from a DSLR.

Enjoy Jalama Beach from the archives of course now in its low res grainy autochrome effect.

Wednesday, July 27, 2011

Still geeking out on the Autochromes


"Foggy Morning" started out as a high res, beautifully saturated Kodachrome from years gone by. A quick scan-a-roo and its digital and ready for some magic. Magic in the form of Adobe CS5 and a few layers of manipulations to get it to an old timey low res Autochrome wannabe. Steps HERE to replicate with your own images.

Sunday, July 24, 2011

Autochromes explained, the video


A short little video explaining Autochromes from idea to final product with some interesting examples. Don't ya just love the educational value to YouTube too?

Autochrome 3 ways

White Roses
Mt Rushmore
Mary At Santa Inez Mission

A few more worked in the Autochrome style from some hi-res digital files. Details to replicate yourself HERE. All do get bigger with a click.

I believe Mt Rushmore is the least successful of the trio. Why? Well there is too much rich grays, I could have reduced the contrast a bit I suppose but when doing so things fell just too flat. Included it just as an example of a sky that worked well enough.

Enough of this for one morning, its off to Harry Potter and the Deathly Hallows Part 2 in a bit.

Saturday, July 23, 2011

Closer still...wish I had a real one to share with you.


Love the autochromes, been obsessed with them actually since I first learned of them in Popular Photography magazine WAAAAAY back in my college years. There aren't any images I can find easily with a "Creative Commons" license, but can share this link to the gallery of images at the American Photography Museum of Photography's show from a few years back. Maybe that will help inspire others to understand the passion I have for those old images.

In looking back at the collection in that gallery one thing that jumps out is the saturation level of colors varied quite dramatically. Some lost all blues, others had them very saturated. Gives me leeway in my exploration of the process in CS5.

As discussed the other day I've discovered that a sky without a lot of detail works better in creating the feel of the originals. I'm happier with this image than with some of the other landscapes.


The steps I took to get this image HERE.

Friday, July 22, 2011

Angeles Forest Bridge ala autochrome


I'm having fun with this process. Now to figure out how to "shoot" for maximum effect when I do go out next. Less sky seems to be the important part of the equation as one doesn't get as much of the effect in sky as one does in the mid-tone ranges. Plus the blue skies are still too blue for the autochrome look to be successful...in real life autochromes the skies tended to white out more than I can do in CS5. Ah, the foolery one must do to make an authentic image.

I like this image still even if it does have too much sky detail in it.

The complete range of steps HERE.

Thursday, July 21, 2011

Cactus ala autochrome


Using the steps I outlined the other day I created this low res grainy "autochrome" for a hi-res digital image. Am glad I took some tutorials as they have opened up some new doors for me to explore in the world of impressionism.

Thursday, July 14, 2011

Down the Autochrome path today.


It would appear I suffer from Adult ADHD, but I really don't. I've loved Autochromes since I first saw them many years ago. Why? Because of their wonderful impressionistic, almost pointillism images they produced. Its a recurring theme with me, impressionism whether I do it in orton, lomo or autochrome style its all about recapturing that movement from over 100 years ago in the art scene in my images today.

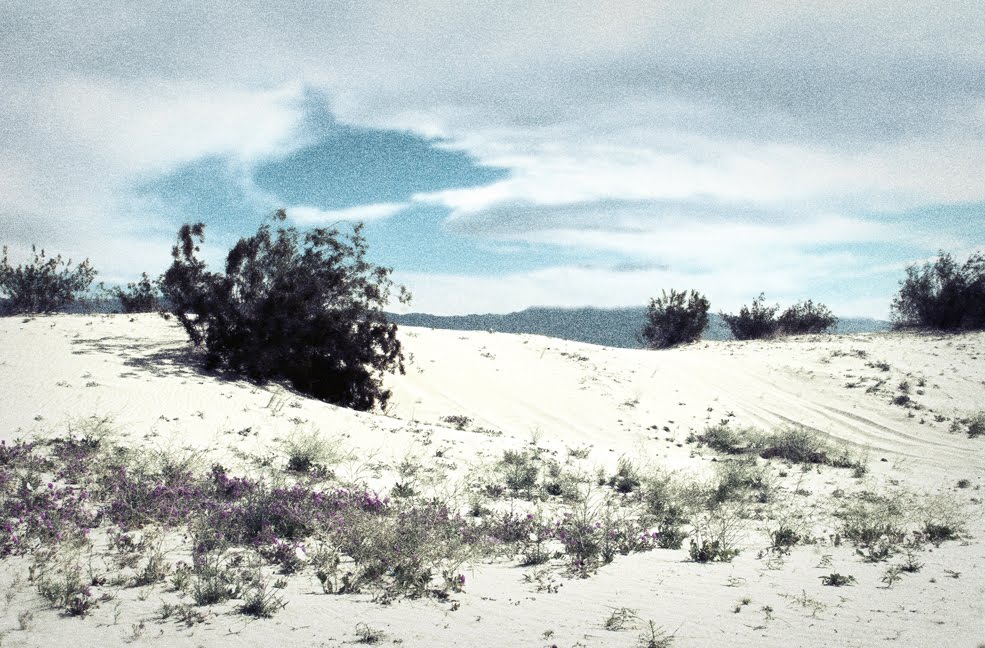
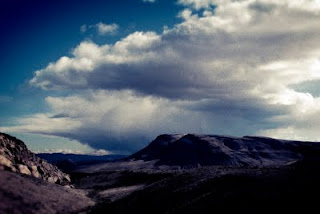
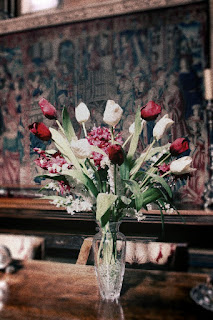
The tutorials I've taken in recent days for Lomo gave me new ideas for recreating Autochromes in all their low res glory from high res, beautifully saturated digital images. These two images I am happiest with as they are much closer in look and feel of an Autochrome than I have been able to recreate in the past.

To break it down into steps for Adobe's CS5 you need to analyse closely what the images were all about. Interestingly their range of image topic was wide, but most focused on tablescapes or grand scale landscapes. There were plenty of portraits done too...but that isn't my bailiwick so we'll move right past that.

First the photographers of the Autochrome era worked with large format cameras with questionable optics. IE narrow depth of field and lenses that created vignetting in terms of edge sharpness and lower light transmission. Secondly the Autochrome was a contrasty film with lost detail in both highlights and shadow leaving a narrow range of grays it can capture. Saturation was low, but the vibrancy of the range of color it could capture was a bit exaggerated. Color shifts were pronounced with blues and red getting more dominance and accuracy than the greens. Blues overtook the shadows more so than any other color. Grain was an issue for them that they used to their advantage in my not so humble, those large dyed grains of potato starch were perfect for creating that pointillist capture adding to the impressionistic view mirroring what was going on in the fine art world of the time.

So here are the steps one must look at doing to create these images. Of course each step will be explained in detail after the list.
1. reduce saturation while increasing some vibrancy in the mid ranges
2. Reduce highlight/shadow detail
3. vignetting with slightly darker and out of focus edges
4. grain

First area to recreate. Open RAW file and adjust the exposure downward, increase clarity and vibrance moderately. Drop black detail to zero. Click OK and open file. Go to adjustment bar and click add gradient map, select Black&White by clicking on the slider bar that appears at top. Chose overlay and adjust to approx 50% opacity. Merge levels.

For the second area in the process go to to the adjustments bar and click levels. Adjust black slider to right to darken shadows more. Adjust highlight tab to left to brighten whites losing some detail. Return to adjustment bar and chose curves. Adjust Red and Green to increase in highlights and decrease in shadow slightly. Adjust blue to increase shadow and decrease slightly in highlights. Go to adjustment bar and click on Vibrancy, significantly increase your vibrancy by moving slider to right. Merge levels. You now have a reduced saturation slighty off color version of the original.

The third area to look at needs a couple of steps. Adding vignette of darker edges and out of focus will take a couple of steps to recreate. First to create the darker edges you use your polygonal lasso tool and draw out a rough oval shape in the image. Right click and chose "inverse selection. Go to adjustment bar and chose levels. Move the shadow slider slightly to the right to darken the edges. Merge layers.

Right click on the image and create duplicate layer. Go to the upper tool bar and chose filters, Blur - lens blur and move slider to right until you are moderately all out of focus but can still identify rough shapes. Click OK. Go to adjustment bar and click on mask. Using paintbrush tool set at 75% opacity and a large brush size, "paint" in your mask over central portion of the image in several strokes, building up to maximum masking at the center and none in corners. (You will notice that your center will increase in sharpness as you build up strokes while edges remain blurry). Merge layers. You now have an image that has darkened out of focus corners with a sharp focused center, center of attention.

The fourth and final area to manipulate is to add grain. Right click on your file and create a new layer. Chose a medium gray and using paint bucket add to the layer. Go to the upper tool bar, Filters, Noise, add noise. Move slider to right to an order of somewhere around 30-50% "noise". Select Overlay and adjust opacity percentage downwards to between 30-60% depending on your personal taste. Merge levels.

A lot of steps, but certainly much better results than the last process I was using. Better as in closer to resembling a true Autochrome. Now if I can just figure out how to recreate the "dots" surrounded in black like the originals I'd really be in business.

Enjoy "Tulips" and "Desert Storm"...Tulips I think is the closest to a true Autochrome in look.