Tuesday, September 28, 2010

Just one final Autochrome....


I finally figured out the blending as noted in yesterdays post. I opted to dig out one more little image from the Che-ez Snap and autochromed it. I liked the image to start with, the graining of it all via the various layers and steps only adds to the old timey feel of the image.


Monday, September 27, 2010

Revisiting the Autochrome...


I don't know what I was thinking but I completely forgot about this treasure trove of images done with the digital camera I had called the Che-ez snap. I found the DVD's from my old Textamerica account and started sifting through them.

I've blogged about that little camera numerous times, what I never thought about was how those low res images might be the key to perfecting the Autochrome look that I wanted. Until yesterday.

These images all started as small low resolution jpegs from that camera. I went and created a few layers until I got the saturation lowered and wider grain of the Autochrome sorta duplicated with the help of Adobe CS5. What I still can't figure out how to do is outline these "grains" with black like the Autochromes themselves had. Until then I can only partially duplicate the look and feel of those old 'chromes.

To get there here is the steps I use.
Create new adjustment later>black & white. Leave blending to "normal" but set opacity to 25%.

Click on the original image and use control+alt+J to create a new layer and label it noise. desaturate the image by about 25% using the adjustment too. Go to Filters>Blur>Gaussian Blur and set the adjustment to "5" pixels. Next go to Filters>Noise>Add dust and scratches and move slider until you just have some visible dust and scratches. Final stop is to go to Filters>Pixelate>Pointillize and adjust towards smaller dots.

Click on the "noise layer" and adjust your mixing to either "soft light" or "hard light" until you get the image that you like.

Merge layers and voila your final image is now set to be saved as a pds file for further use or jpeg for publishing on flickr or similar.

Sunday, September 26, 2010

Real Toy Camera...


I had a toy camera called the Che-ez Snap. It was tiny, hardly bigger than a postage stamp. Its optics was fixed focus, with the edges being really sketchy. Color was off and over saturated. Contrast was off as well...on the contrasty side rather than flat so I liked the results, most of the time. It was all of .2, yes POINT 2 mega pixels and I loved its low Res images to pieces.

These are a few select few that are being printed up for inclusion in my goodies satchel for things to dig through (and purchase if so inclined) at my Artists Reception at Bolt Barbers' Gallery on October 14, 2010. (Details in a prior post).


Saturday, September 25, 2010

More with the toy camera...


Years ago, 2003 to be precise, before I switched from silver to a DSLR we had a little digital point and squirt for just snapshots of the kids and stuff. In retrospect that little 2.0 megapixel camera had a lot of the qualities of a toy camera, or at least a cell phone camera.

I snapped this image up on Jalama Beach on CA's Central Coast October of 2003 and found it while rummaging around for other stuff. The composition is good, the basic image is grainy to start with, pixelated colors that look like traditional film grain when viewed large and was already for a little run through CS5 to finish off the "toy camera" look that I am so enamored with at the moment.

I took the basic image and used "filters">"Lens distortion" and cranked up the vignetting, added a little chromic aberration then adjusted the curves to darken the blacks a bit and lighten up the center ranges.

Flamed and vignetted...


I love the look of the old school toy camera. I'm also a big fan of super saturated color, and to get there today I used the vignetting tools in Adobe's CS5 to get the corners adequately darkened and still keep the center light and focused. I didn't opt for the off color registrations you could get by switching up your color chemicals like you could in old school silver based media. Rather I went for the contrasty overly saturated colors and contrast one got from the old Cibachrome print material.

To get this image I opened the RAW file and used the lens correction tool. Instead of minimizing the distortion I went the other direction and maximized the vignetting and upped the barrel distortion some to further the "fish eye" look. Once done I went into the saturation levels and upped the saturation for orange and yellow a bit to make the flames "flamier". Then I hit the ok button and opened the file and continued to work it in the 8 bit mode it was converted to for PSD files.

I used the adjustments to alter the hue and color to compensate for this being shot in the early morning in the shade. Then I made one last attack on the vignetting by going to "filter">"lens correction" and bumped up the vignette to further darken the corners. I did this to put the background elements more into the shadows making the old Flamed Woody the center of attention. Then I upped the center lighting value some to brighten up the car. Once done I flattened it all with the layers tool and converted to a smaller 72dpi jpeg file for publication here.

The real image is much larger and detailed than this compressed jpeg portrays, but you still get a sense of what the printed image is like.


Tuesday, September 21, 2010

Open invitation to my Artists Reception 10/14/2010


Mark your calenders, October 14, 2010, 7PM to 9:30PM for my artists reception at Bolt Barbers in Los Angeles. The addy...460 S Spring Street (corner of 5th and Spring) Los Angeles CA. The reception will include a hosted "Candy bar"...perfect to kick off Halloween. There is no need to RSVP as this is open to the public.

It will be held in conjunction with the Downtown LA Art Walk that runs 5-10PM on that day. Be prepared for tight parking. The Hotel Alexandria at 501 S Spring Street has underground valet parking and you can buy discounted parking from the Bolt good at the hotel. Worth every penny to avoid the other more known public lots in the area.

As soon as Bolt has their artists page updated.

The curator of the exhibit, Betsy Matz designed the post cards and chose one of my favorite images to use on the card. "Abandoned Church, Paris" is one of my favorites for many reasons. Chief of which is that its proof that the greatest rewards are when we stray from the beaten path.

We were on a walking tour of the old Jewish quarter when the guide had us change directions and pointed out there was "nothing to see" down this one small street as the church there was being gutted to turn into retail shops etc.,. Fine I kept walking. We rounded a couple more corners and he pointed out again "nothing to see...." and gave the same reason pointing down the general direction we had been. I broke ranks and jogged down the half block and look what I found, this terrific old church, built in the 1500's being gutted. What a wonderful patina to the walls, the rough hewn beams and on the other side of the wall, the church's old courtyard in full spring bloom with Victorian era apartments on the other side.

I had the camera set in seconds for bracketed exposures and shot it with HDR post processing in mind. I used Photomatix for the post processing in to the HDR file and kept it adjusted for photo-realism with maximum detail in the shadows to highlights. Had I not used HDR file generation I would have had either a beautifully exposed courtyard with a blacked out church, or church detail with blown out highlights for the courtyard. Classic win/win that you can get with HDR and keeping it real instead of surreal.

See you at the reception!

Sunday, September 19, 2010

Making it look like a toy camera...


Ah, the Diana, that old school "toy camera" that launched a photo revolution for its artsy out of focus and lost edge detail was one I too played with. Not as much as the "art photographers" I hung out with at dear old SIU, I was a commercial photo guy after all and our disciplines were supposed to be at cross purposes. Supposed to be but then again I've always had a hard time staying in the lines.

I stumbled across a tutorial for recreating a "Lomo" style toy camera image today and got to thinking about my long lost Diana and the images it could create. Especially if you shot slide film and had it processed in "negative" film chemicals. The changes in saturation, contrast and a host of other things created images that took advantage of the toy cameras basic "flaws". I got the urge to start recreating those images from razor sharp digital images and see what happened.

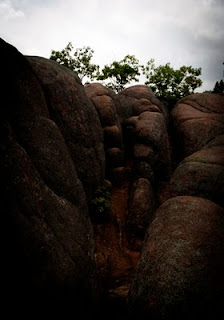
See what happened? I took a stock shot from Elephant Rocks I shot while back in MO over the summer. I am pleased with the result.

To get this image I opened a RAW file in CS5 and used the lens correction tools. I ignored the simple corrections for axis and depth of field correction and went straight to the vignetting tool to darken the corners. From there I opened the image and did a save as jpeg so I would have a standard image to work with while experimented.

The next step was to adjust the hue and color to the most natural state I could get and saved.

Next was the "duplicate layer" and let it be labled "background layer" automatically. I adjusted the saturation to more and increased the brightness by a factor of 10, playing around a bit so I kept the corners noticeably darker without blowing out the center as too bright.

Next step was to go to blur and chose lens blur. There I made several changes. I increased the blade curvature and rotation until I got the level of blur that enabled most details to remain, just pick up an overall out of focus, softness to the layer. Specular Highlights was also adjusted, to a factor of 17 for brightness and threshold moved all the way over to 255. Noise remained at 0, distribution was kept as "uniform". From there I hit OK and the PC applied the changes.

The next step was to go to the layers histogram and chose "soft light" as the blending option. This enabled to the softness of the overall background to show through keeping the feel of a toy camera in place.

Of course the easier solution to all of this is to simply find another toy digital camera that has the same "problems" IE poor optics, cheap sensors etc., that by their nature create toy camera images with all their inherent lovable flaws. May have to do that again, imagine the fun of manipulating those images down further!

Saturday, September 18, 2010

Sistine Culvert

This started out as a decent piece of urban art. Then the taggers arrived and tagged it over so many times that it no longer was art, just a tagging piece. Interesting that they opted to work under a culvert slowly filling it up towards the ceiling almost like the Sistine Chapel. Our little renaissance artists at work?

This is an image shot bracketed with HDR post processing in mind. The HDR File was generated with Photomatix (I keep going back to it as I like it, comfort zone issue likely, but I like the fine tuning tools better still). The HDR file was then processed into 8bit and tone, color adjusted and resized for publication in Adobe's CS5.

Saturday, September 11, 2010

Couple of more from the Orton path...


So the romanticism of the orton style got to me today. It got me thinking about some of my older images and how they could be reworked in the Orton style to change the look and feel of the images. So I started digging through the archives and redid these too.

To get there I duplicated the image using Adobe's CS5. The duplicate layer was labeled "background" copy. With that layer I then proceeded to increase the exposure the equivalent of 2 f stops and then through it out of focus with the blur function. The resulting image was then blended with "multiply" to allow both layers to show through. The resulting image was then merged and dumbed down (smaller lower dpi) for easy upload and viewing.

Enjoy "Cemetary Sunset" and "Silent Yard".

Ala Orton : 1960 Oldsmobile Low Rider


I love orton and the way it gives such a soft romantic look to an image. In this case it adds to the old timey romanticism of the antique car that I spotted at a car show this morning. I loved this car and wanted to do more than just document it, I wanted impart some emotion while maintaining its sense of power. Orton to the rescue.

To get there I duplicated the image using Adobe's CS5. The duplicate layer was labeled "background" copy. With that layer I then proceeded to increase the exposure the equivalent of 2 f stops and then through it out of focus with the blur function. The resulting image was then blended with "multiply" to allow both layers to show through. The resulting image was then merged and dumbed down (smaller lower dpi) for easy upload and viewing.

Enjoy 1920 Oldsmobile Lowrider. It does click for a larger image.

Thursday, September 09, 2010

Installed at Bolt Barber's Gallery in Downtown LA


Its as official as it will ever be. I've been installed and have 15 Pieces hanging at the Bolt Barber's Gallery in Downtown LA.

The show runs through October 30, 2010. The opening reception should be tied to the Downtown LA Art Walk set for the second Thursday in October. As soon as I have the details will be posted here for you. (Just in case you want to come see me).

This show was curated by Betsy Matz and she did a great job grouping my work and putting it up for display in the Gallery portion of Bolt Barbers.

Deets: Bolt Barbers 460 South Spring Street, Los Angeles CA (5th and Spring for your cross streets). Parking can get pricey and is scarce downtown. However....if you park in the lot under the Hotel Alexandria (501 Spring Street) and purchase a validation at Bolt for $3.00.

Saturday, September 04, 2010

Gallery Card Proof


Its' official, am going into the Bolt Barbers Gallery in downtown Los Angels for a nice 2 month run. I"ll be announcing the opening reception as soon as the date has been nailed down. Likely it will be a late opening reception set in conjunction with the Downtown LA Art Walk. Exact date will be announced as soon as I know it.