Tuesday, October 12, 2010

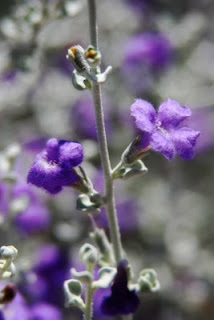
Desert Heather...ala Orton


I still am always amazed how much easier and faster it is to create with a pc vs silver based material. Orton wasn't that hard of a process, but it was time consuming getting the color balanced and exposures down when trying to print through doubled up slide film. Adobe's CS5 makes it all the easier.

As a refresher Orton was a guy back in the 70 who would do two shots of the same subject on slide film. One was razor sharp and perfectly exposed, the other was out of focus and over-exposed. The two were sandwiched together and printed resulting in a very surreal in focus/out of focus with artifically saturated colors.

To achieve this in Adobe the process is similar in theory. You take one sharply focused and exposed file. You open it and duplicate a layer labeling it "Background copy".

With that copy you go to Image>Adjustments>Exposure and increase your exposure by a factor of 1-2.0 so you "blow out" or lose all highlight detail. Got to Image>Adjustments>Hue/Saturation and increase the saturation by a factor of 10-30 depending on how the changes look to you.

The next step is go to Filters>Blur>Gaussian Blur and chose pixel range of 10-25 depending on the amount of blur you need. Less if you have an already blurred background, more if you don't.

The final step is go to the adjustments box on the side margin and select "Multiply" as your blending option.

There you go a few simple steps for recreating the look and feel of the old silver based "Orton effect" images.


Monday, October 11, 2010

Piled Higher and Deeper in Venice Beach


I love the insanity of this camper. So much stuff they had to bring along a mini-van to hold the extra. I have no idea what the story is behind this is, but that festive banner flying on the main camper tells me this is a fun crowd not some down and out of luck scenario.

The image was shot purposefully with HDR file generation in mind by bracketing the exposures 2 stops +/- from average. The HDR file generation was completed with the help of Adobe's CS5 that I also used for the tone mapping. Tone mapped for max saturation and definition between the various shapes so it took on a lot of blocks of color emphasizing the surreal nature of the setting itself.

IT will be in the satchel of goodies for you to peruse at this coming Thursday (10/14) Artists Reception at Bolt Barber's in Los Angeles. For those that forgot the details it is set for 7-9:30PM at Bolt Barbers, 460 S Spring Street (5th and Spring) Los Angeles CA.

Saturday, October 09, 2010

Shooting in low light doesn't always need HDR or a Flash to work

Shooting with just the existing natural light is a challenge. First you have to decide how much detail and noise you are willing to accept for a higher ISO. Why the higher ISO need...you don't always have the benefit, or permission even, to use a tripod let alone "brace" yourself on something if you are in a museum or similar setting. The higher ISO allows for a faster shutter to eliminate camera shake, but it does so at the expense of image quality as the ISO climbs.

Bracketing is the salvation of shooting with a window providing the light.

Thank goodness for tone mapping being able to be applied to an image to bring all tones captured into range that can be displayed on your screen or printed image material.

For this image of the captain's desk on the Queen Mary I didn't have the benefit of being able to use a tripod or brace myself on something. I knew I was good for relatively slow shutter speeds (1/10 second) so I set my ISO at a moderate 800 and bracketed 1 stop each way from metered.

The final image was cleaned up for color balance, a bugger when you have sunlight streaming in from a window coupled with regular incandescent lighting through the use of Adobe's CS5 color tone and color filters. After that was done the image was tone mapped to bring down the bright window to a more acceptable level and bring in some more of the shadow details. Low light image rescue completed.

This won't be among the images at Thursdays Bolt Barbers Gallery Reception. There will be ample images on the wall and in my trusty satchel for you to peruse. The gallery is located within Bolt Barbers, 460 S Spring Street, Los Angeles CA. The reception is 10/14/2010, 7-9:30PM.

Monday, October 04, 2010

One more for the show....


Dang it all. Both printers decided to die on me in the middle of yesterdays effort to get some oldies but goodies added back to the satchel for the October 14, 2010 Bolt Barbers' Gallery reception. Alas the 'puter and art gawds aren't playing well together.

Before it died I did get one last print done. Always loved the haunting look of this image...

Friday, October 01, 2010

More of me@ Bolt Barbers Gallery

Bolt Barbers' updated their web to include some thumbnails of a few of the pieces in the show. The reception is going to be big. BIG I tell you. Why you may ask? Bolt will host Hot on Yelp's "Beauty & The Hairy Beast Event from 5P-10P. Live DJ on hand and all services will be free with suggested donation for each service to benefit The Midnight Mission.

The Bolt Barbers' Gallery link on me is HERE.

As a reminder...the reception is set for Thursday October 14, 2010 7-9:30PM. Bolt Barbers 460 S Spring Street, Los Angeles CA.